Documentation : how to use Make Stories for Blogger
Don't follow this documentation! read more
Check out our resources below to create your first web stories for Blogger.
Actually, blogger.com doesn't support web stories. So, we will create web stories using this tool and upload these web stories to GitHub.com . For this, we have to follow some steps.
[1] Create a GitHub account and connect our custom domain or sub domain.
[2] Create Web Stories using our tool.
[3] Finally, upload the created web stories to GitHub.
Now a days Web story is trending but it's easy to create only in WordPress, not in Blogger. you can use makestories.io to create and host your web stories on their server but we don't want because we want to create web stories on our own blog. So, today I will tell you how to make web story for blogger.
We will divide it into two parts.
Step 1 : We will create a GitHub account and add a custom or sub domain.
Step 2 : We will create a web story using our Make Stories tool and upload it to GitHub.
Step1 : Create a GitHub account and add a custom or sub domain.
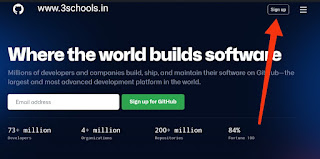
Method 1 : First go to GitHub.com and click on sign up button (if needs).
Method 2 : After sign up , login to your account.
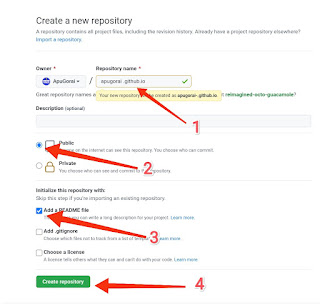
Method 3 : Click on New repository button to create a new repository (I'm not describing it because not need).

- Add a name for your repository for example apugorai.github.io or your user name.github.io
- Choose the repository visibility to public.
- Click on the checkbox to Add a README file.
- Finally, click on the Create repository button.
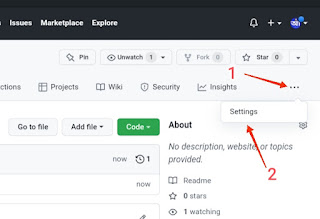
Method 5 : Now, create a page. For this, click on the three dots and then the setting button.
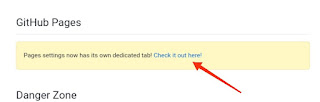
Method 6 : Now, scroll down until you find the GitHub page section. Then click on the check it out here link.
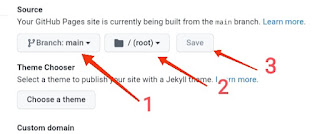
Method 7 : Click on the drop down and change it to main from none. Then save by clicking the save button.
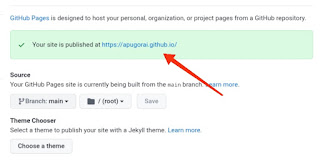
Method 8 : Finally, GitHub page successfully created. Click on the link to view your page.
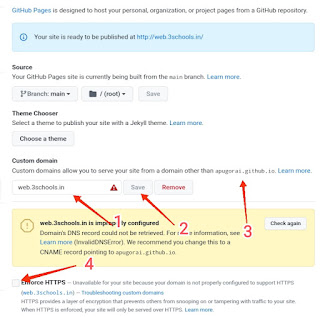
Method 9 : Now, we will learn how to add a custom sub domain to your GitHub page. Suppose, you have a custom domain 3schools.in and you want to create a subdomain web.3schools.in , then you can follow the steps below.
Method 10 : Enter your custom subdomain and click on save button. Then, copy the link shown on the image below [3]
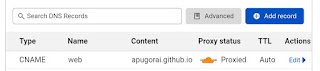
Method 11 : Now, go to your Cloudflare dashboard and login (if needs). Don't worry 😥, we will just add a CNAME record. Wait for a couple of minutes until your domain is ready.
Step 2 : Make your web stories and upload those to GitHub page.
Method 1 : First, go to our Make Stories for Blogger tool.
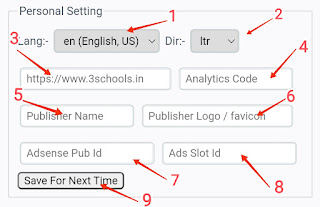
- Select the language of you web story from the drop down box. If the language is not available then select english language by default.
- Select the direction of your web stories (eg. left to right | right to left).
- Enter the url/link of your blog where you upload the web stories. Please follow the structure of the url shown in the picture.
Please do not add a forward slash (/) to the end of the URL. Url support eg. https://www.3schools.in , http://www.3schools.in , https://web.3schools.in , etc.
- Paste the Google Analytics track code . The code looks like UA-193488541-8
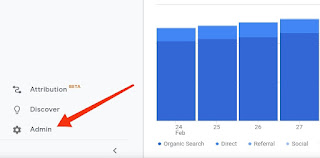
A. Go to the Google Analytics account and click on the admin section in the bottom left corner. Then select your account and copy the code.
- In the Publisher Name box, enter your blog name (eg. 3schools ).
- Upload the logo of your blog in Blogger , copy the link of the logo and paste the copied link in the Publisher Logo box. According to Google, the logo image should be larger than or equal to 96x96px and maintain a 1:1 aspect ratio.
- If your site is already approved by Google AdSense then go to your AdSense dashboard and create a new responsive ads . Copy the marked code of your ads. data-ad-client='ca-pub-763351151276678' data-ad-slot='8868079869'. Copy the data-ad-client value and paste it in the AdSense publisher box.
- Copy the data-ad-slot value and paste it in the Ads slot id box.
If you don't have any AdSense account then don't fill any data to those input boxes.
If your main domain (eg. 3schools.in) is approved by Google AdSense and you use a subdomain (eg. web.3schools.in) then add your subdomain to your Google AdSense , your subdomain will be approved immediately. - Click the Save for next time button ,if you don't want to write the above content manually.
Method 3 : Web Stories Setting Section.
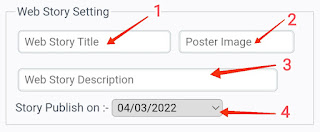
- Write a proper title for your web story . According to Google, keep titles shorter than 70 characters. In my case, the title is How to make web stories for Blogger.
-
- Write a description for your web story.
- Select the date when you want to publish your web story from the Story Publish Date drop down (Change it for once).

Method 4 : Let's create a page.
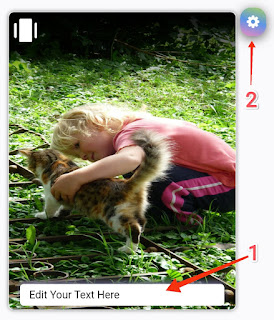
- Write Something that you want.
- Use the options to style the text, change text or background color, add a link etc.
- To add a button, select the text, click on the ➕ icon and enter a link.
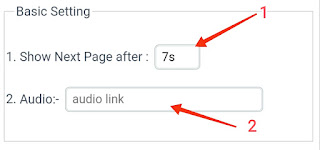
- For each page, there is a separate setting button to style the specific page.
- In the show next page after input field, enter a valid number (eg. 8s , 10s etc.).
- To add an audio to a specific page, enter the audio link.
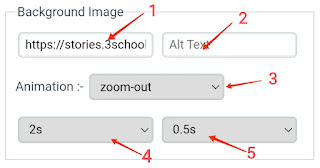
- Upload an image to your Blogger post, copy the image link and paste it here.
- When browsers are unable to display the images, in place of images the website will return the alt attributes. However, it also helps search engine crawlers and improves SEO.
- Select an animation for the background image.
- The animation duration defines how long an animation should take to complete one cycle.
- The animation delay specifies the amount of time to wait from applying the animation to an element before beginning to perform the animation.
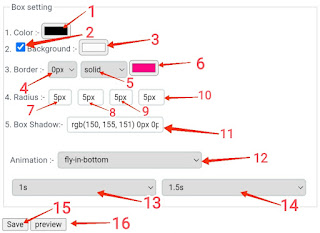
- You can change the text color of the dox.
- If you want to remove the background color of the box, remove the check mark from the checkbox.
- .4.5.6.7.....

Method 5 : Upload your web stories to the GitHub page.
- After creating a web story, click on the Download button to save the web story as a html file.
- Login in your GitHub account and click on the Add File drop down box and then Upload Files button.
- Upload your file of the web story and then click on the Commit Changes button.
- Finally , add this web story in your home page. For this back to Make Stories tool and click on the Copy Post button.
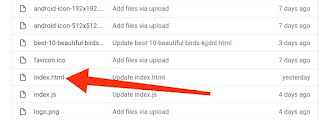
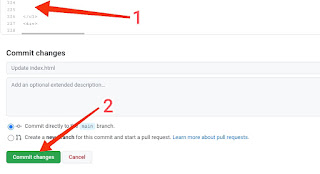
- Back again to GitHub, click on index.html file and click on edit icon.
- Paste the copied code before the </ul> tag and click on Commit changes.


Congratulations
You have successfully completed your first Web Story using Make Stories for Blogger!
In this tutorial, you learned to:
- Create a GitHub account.
- Connect a custom subdomain to GitHub page.
- Use and style web story.
- Upload your web story to GitHub page.
- Create a custom home page.